Battery switch on travel trailer function is crucial for managing your RV’s power. Understanding how to use and maintain this simple yet vital component ensures smooth and safe travels. This guide breaks down everything you need to know, from basic operation to advanced troubleshooting, empowering you to confidently handle your travel trailer’s power system.
We’ll explore different battery switch types, their advantages and disadvantages, safe connection and disconnection procedures, and how they interact with other power systems like solar panels and converters. We’ll also cover essential preventative maintenance to keep your battery switch functioning optimally for years to come, saving you potential headaches and downtime on the road.
Understanding Battery Switch Functionality in Travel Trailers
Properly managing your travel trailer’s power sources is crucial for a successful trip. Understanding your battery switch is key to this, ensuring you have power when and where you need it. This section will clarify the different types of switches, their functions, and how to use them safely and effectively.
Types of Battery Switches in Travel Trailers
Travel trailers typically use one of two main types of battery switches: a simple on/off switch or a more sophisticated multi-position switch. Simple on/off switches are the most basic, providing a single on/off control for the house batteries. Multi-position switches offer greater control, allowing you to isolate the house batteries, connect them to the chassis battery (for starting the tow vehicle), or connect both to the shore power.
Purpose of Battery Switches: Managing Power Sources
The primary purpose of a battery switch is to manage the flow of power between your travel trailer’s house batteries (which power the interior lights, appliances, and other systems) and the chassis battery (which starts your tow vehicle). This control prevents accidental draining of one battery by the other and allows for selective charging and usage. For example, if you’re parked and connected to shore power, you might want to isolate the house batteries from the chassis battery to prevent the chassis battery from discharging into the house system, which could leave you stranded.
Conversely, if your house batteries are low and you need to start your tow vehicle, you can use the switch to connect both batteries temporarily to ensure sufficient power for starting.
Operating a Battery Switch: A Step-by-Step Guide
Before operating your battery switch, always consult your travel trailer’s owner’s manual for specific instructions. Generally, the process is straightforward:
- Locate the battery switch. It’s usually found near the batteries themselves or in a convenient access panel.
- Identify the switch positions. Common positions include “Off,” “Battery 1 (House),” “Battery 2 (Chassis),” and “Both.” The labeling might vary slightly.
- Select the desired position. If you’re parked and connected to shore power, “Both” might be suitable for charging both batteries. If you’re using only house power, select “Battery 1.” If you need to start your tow vehicle and your house batteries are low, carefully select “Both” to temporarily boost starting power.
- Confirm the selection. Ensure the switch is securely in the chosen position.
Always remember to turn the switch to “Off” when not using the batteries to prevent accidental discharge.
Advantages and Disadvantages of Different Battery Switch Designs
| Battery Switch Type | Advantages | Disadvantages |
|---|---|---|
| Simple On/Off Switch | Simple to operate, inexpensive | Limited control over power flow, can lead to battery drain if not used carefully. |
| Multi-Position Switch | Provides greater control over power flow, allows for selective charging and prevents accidental battery drain | More complex to operate, slightly more expensive. |
Troubleshooting Common Battery Switch Issues
Your travel trailer’s battery switch is a crucial component, ensuring you can easily switch between your trailer’s battery and the tow vehicle’s charging system or shore power. Problems with this switch can leave you stranded with dead batteries, so understanding how to troubleshoot them is essential. This section will cover common issues, diagnostic techniques, and preventative maintenance.
Identifying Common Battery Switch Problems
Several issues can arise with your battery switch. Corrosion is a frequent culprit, building up on the terminals and preventing a good electrical connection. Loose connections, often caused by vibration during travel, can lead to intermittent power or complete failure. Finally, the switch itself might malfunction due to wear and tear or internal damage. These problems can manifest as an inability to switch between battery banks, dim lights, or complete power loss.
Diagnosing a Malfunctioning Battery Switch
Diagnosing a faulty battery switch involves a systematic approach. First, visually inspect the switch for signs of corrosion. Look closely at the terminals for any green or white buildup. Next, check for loose connections by firmly tightening all terminal nuts and bolts. If corrosion is present, clean the terminals with a wire brush and baking soda solution, ensuring thorough cleaning before reconnecting.
If the problem persists after cleaning and tightening, test the switch’s functionality with a multimeter. Set your multimeter to measure voltage. Measure the voltage at the battery terminals and then at the output terminals of the switch in each position (e.g., “battery,” “both,” “off”). A significant voltage drop indicates a problem within the switch itself. For example, if your battery shows 12.6V, but the output shows only 11V, there is a significant voltage drop suggesting a problem with the switch or wiring.
Troubleshooting Steps for Battery Switch Problems
Once you’ve identified the problem, resolving it is usually straightforward. Corrosion can be addressed by cleaning the terminals as described above. Loose connections require tightening. If the switch itself is faulty, replacement is necessary. Always disconnect the battery’s negative terminal before performing any work on the switch or wiring to prevent accidental short circuits.
Remember to consult your trailer’s manual for specific instructions and safety precautions. Replacing the switch involves disconnecting the wires, removing the old switch, and installing the new one, ensuring all connections are secure and free of corrosion.
Preventative Maintenance for Extended Lifespan
Preventative maintenance is key to extending the lifespan of your battery switch. Regularly inspect the switch and terminals for corrosion, cleaning them as needed with a wire brush and baking soda solution. Tighten any loose connections. Consider applying a dielectric grease to the terminals after cleaning to prevent future corrosion. This grease helps repel moisture and prevents the buildup of corrosion.
Annual inspections are recommended, especially if your trailer is frequently exposed to the elements. By proactively addressing potential problems, you can significantly extend the life of your battery switch and avoid costly repairs or inconvenient breakdowns.
Connecting and Disconnecting Batteries Safely
Properly connecting and disconnecting your travel trailer’s batteries is crucial for safety and to prevent damage to your electrical system. Always prioritize safety when working with batteries, as they contain corrosive acid and can generate sparks.Connecting and disconnecting your batteries involves a straightforward process, but adhering to safety protocols is paramount. Failure to do so could lead to injury or damage to your equipment.
Battery Connection Procedure
Before beginning, gather your necessary tools: a wrench (the correct size for your battery terminals), safety glasses, and rubber gloves. Always wear safety glasses to protect your eyes from splashes of battery acid, and rubber gloves to protect your hands from corrosion and acid burns. Inspect the battery terminals for corrosion; clean them with a wire brush if necessary.
1. Ensure the Battery Switch is OFF
This is the most important step. Turning the switch to the “OFF” position isolates the batteries from the trailer’s electrical system, preventing accidental shorts or shocks.
2. Connect the Positive (+) Terminal First
Use your wrench to securely attach the positive (+) cable to the positive (+) terminal on the battery. Make sure the connection is tight and there are no loose wires.
3. Connect the Negative (-) Terminal
Next, connect the negative (-) cable to the negative (-) terminal on the battery. Again, ensure a secure connection.
4. Double-Check Connections
After connecting both terminals, visually inspect the connections to ensure they are tight and secure. Any loose connections can lead to arcing and potential hazards.
5. Turn the Battery Switch ON (after all connections are secured)
Once you’re certain all connections are secure, you can turn the battery switch to the “ON” position.
Battery Disconnection Procedure
Disconnecting the batteries follows a similar process, but in reverse order, and with equal attention to safety.
1. Turn the Battery Switch OFF
This is the critical first step. It disconnects the power to the trailer’s electrical system, preventing accidental shorts or shocks.
So, you’re prepping for a road trip? Awesome! First things first: make sure your travel trailer’s power is sorted. Understanding the function of your battery switch on travel trailer function is crucial for keeping your lights and appliances running. Once that’s set, let’s talk tunes! For the ultimate mobile listening experience, check out this guide on setting up an audiophile travel aetup – it’ll transform your road trips into concert-level sound experiences.
Happy travels!
2. Disconnect the Negative (-) Terminal First
Using your wrench, carefully disconnect the negative (-) cable from the battery’s negative (-) terminal.
3. Disconnect the Positive (+) Terminal
Next, disconnect the positive (+) cable from the battery’s positive (+) terminal.
4. Store Cables Safely
After disconnecting the cables, store them in a safe place to prevent accidental contact or damage.
5. Inspect Battery Terminals (Optional)
After disconnecting, take a moment to visually inspect the battery terminals for any signs of corrosion. Cleaning them regularly helps maintain good electrical contact and prolongs the life of your batteries.
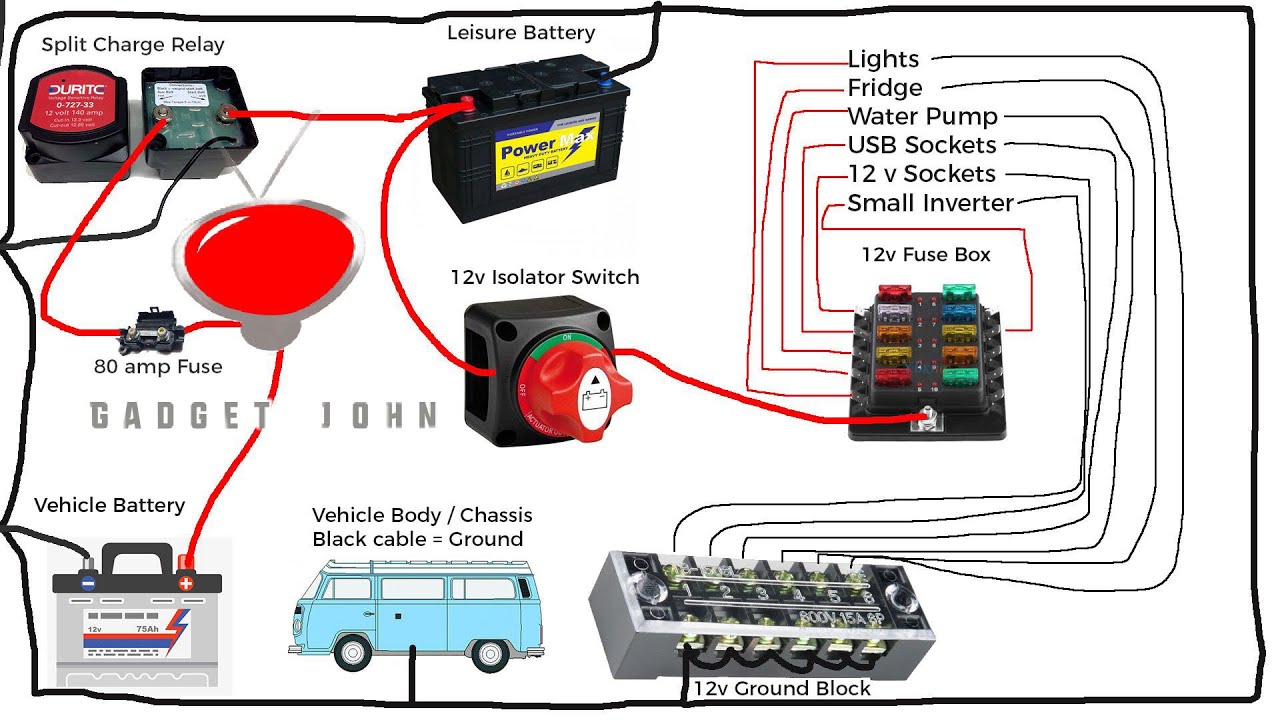
Typical Battery Switch Wiring Configuration
This table illustrates a typical wiring configuration for a battery switch in a travel trailer. Remember that variations exist depending on the specific setup. Always consult your trailer’s wiring diagram if you have any questions or concerns.
| Wiring Connection | Description |
|---|---|
| Battery Positive (+) Terminal to Switch Input (+) | This connects the positive terminal of the battery to the positive input of the battery switch. |
| Switch Output (+) to Trailer’s Electrical System | This carries the positive power from the switch to the trailer’s electrical system. |
| Battery Negative (-) Terminal to Trailer’s Chassis | This is the ground connection for the battery, usually connected directly to the trailer’s chassis. |
| Switch Input (-) to Trailer’s Chassis (ground) | This provides a ground path for the switch. |
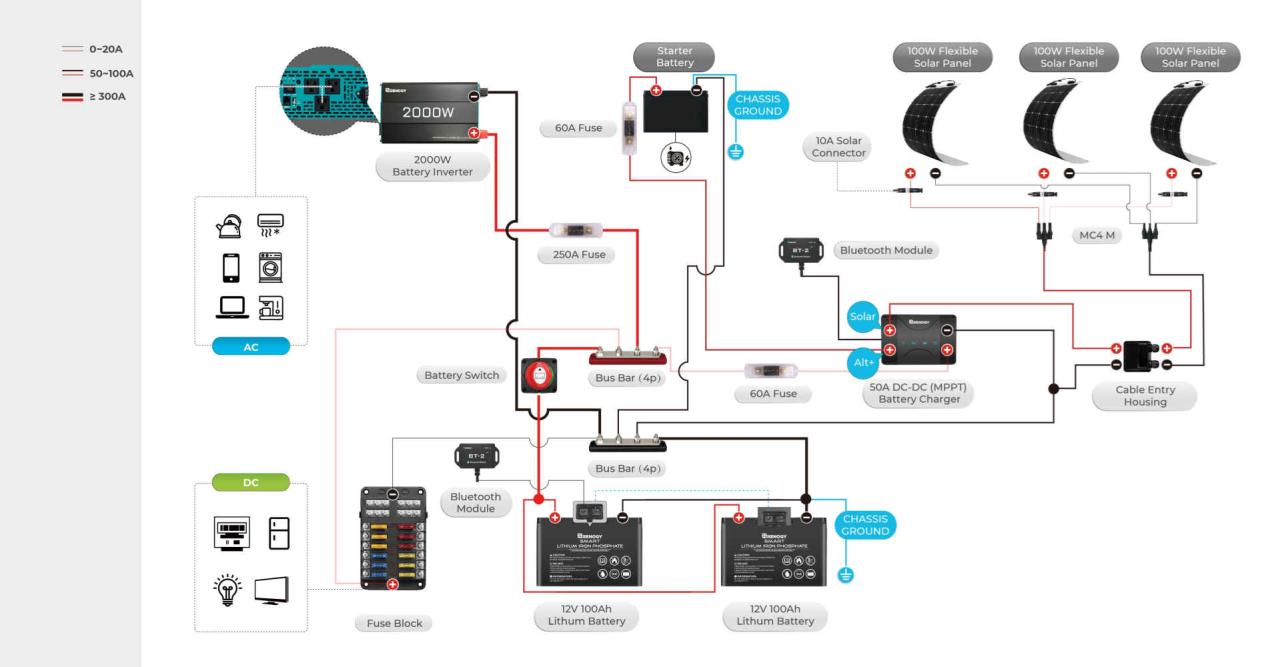
Battery Switch and Power Management Systems: Battery Switch On Travel Trailer Function
Your travel trailer’s battery switch is a crucial component in a larger power management ecosystem. It doesn’t operate in isolation; instead, it interacts closely with other systems to ensure efficient and safe power distribution. Understanding these interactions is key to maximizing your RV’s power capabilities and extending the life of your batteries.The battery switch acts as the central on/off control for your house batteries, allowing you to isolate them from the rest of the electrical system when needed.
This isolation is important for preventing accidental drain on your batteries, particularly when your trailer is stored for extended periods. However, its role extends far beyond simple on/off functionality, influencing how solar panels, converters, and other power sources interact with your batteries. For instance, a properly configured system allows you to charge your batteries from shore power through the converter while simultaneously charging them from your solar panels.
The battery switch ensures that this charging happens safely and efficiently, preventing overcharging and maximizing battery lifespan.
Power Management Strategies and Battery Switching
Different power management strategies leverage the battery switch in varying ways to optimize energy use and battery health. Choosing the right strategy depends on your specific needs and the components in your RV’s power system.
- Strategy 1: Simple On/Off Control. This is the most basic approach. The battery switch simply connects or disconnects the house batteries from the rest of the system. This strategy is suitable for trailers with minimal power demands and no additional charging sources beyond the converter.
- Strategy 2: Integrated Solar Charging. Here, the battery switch allows for charging from both shore power (via the converter) and solar panels. A charge controller manages the solar input, preventing overcharging. The switch ensures that the batteries are disconnected when not in use, protecting them from deep discharge.
- Strategy 3: Advanced Power Management Systems. More sophisticated RVs use advanced power management systems that automatically regulate power flow between various sources (shore power, generator, solar) and the batteries. The battery switch remains a crucial safety element, allowing for manual override and complete isolation of the batteries when necessary. These systems often include features like battery monitoring and intelligent charging algorithms.
Battery Switch and Efficient Power Usage
The battery switch plays a direct role in promoting efficient power usage and prolonging battery life. By allowing you to disconnect the house batteries when not needed, it prevents parasitic drain—a slow, constant discharge that occurs even when appliances are turned off. This parasitic drain can significantly reduce battery lifespan, especially in storage. Furthermore, the switch’s ability to manage the flow of power from multiple sources, as in Strategy 2 and 3 above, ensures that batteries are charged optimally, preventing overcharging or undercharging, both of which can damage batteries.
For example, a deep-cycle lead-acid battery will significantly shorten its lifespan if consistently discharged below 50% of its capacity. Proper use of the battery switch, coupled with a smart charging system, helps prevent this.
Selecting the Right Battery Switch for Your Travel Trailer
Choosing the correct battery switch is crucial for safe and reliable power management in your travel trailer. The wrong switch can lead to overheating, damage to your batteries, or even a fire. This section will guide you through selecting a switch that meets your specific needs.
Several factors determine the appropriate battery switch for your setup. Primarily, you need to consider the size and type of your batteries (e.g., deep-cycle lead-acid, lithium-ion) and their combined amperage draw. The switch’s amperage rating must exceed the maximum current your batteries and appliances could demand simultaneously. You should also consider the type of switch (e.g., single-pole, double-pole, double-throw), its construction (e.g., waterproof, enclosed), and any additional features that might be beneficial, such as a built-in voltmeter.
Battery Switch Amperage Rating and Battery Type Considerations
The amperage rating of your battery switch is paramount. This rating indicates the maximum continuous current the switch can handle without overheating or failing. Underestimating this rating can lead to dangerous situations. For example, if you have two 100 amp-hour deep-cycle lead-acid batteries, and your appliances might draw a combined 100 amps, you’ll need a switch rated for at least 150 amps to provide a safety margin.
So, you’re prepping for your next adventure in your travel trailer? Awesome! First things first: understand your power. Check out this guide on the battery switch on travel trailer function to avoid any dead-battery surprises. Once you’ve got that sorted, it’s time to think about entertainment. For a truly immersive experience, consider building an audiophile travel setup – you deserve amazing sound on the road!
Lithium-ion batteries often require even higher amperage ratings due to their higher discharge rates. Always consult the manufacturer’s specifications for your batteries and appliances to determine the total amperage draw.
Types of Battery Switches and Their Applications
Different battery switches offer varying levels of functionality and are suited to different needs. Here’s a comparison of some common types:
| Switch Type | Amperage Rating (Examples) | Features | Advantages |
|---|---|---|---|
| Single-Pole, Double-Throw (SPDT) | 50A, 75A, 100A | Simple on/off switching between battery banks or shore power. | Cost-effective, easy to install. Suitable for simpler setups with one battery bank. |
| Double-Pole, Double-Throw (DPDT) | 50A, 75A, 100A | Simultaneous switching of both positive and negative terminals. Provides better safety and isolation. | Improved safety, isolates batteries completely when off. Ideal for larger setups or when using multiple battery banks. |
| Rotary Switch (Multi-position) | 50A, 75A, 100A | Offers multiple positions for selecting different power sources (e.g., batteries, shore power, generator). Some include built-in voltmeters. | Versatile, allows selection of multiple power sources. Built-in voltmeter provides convenient battery monitoring. |
| Electronic Battery Switches | Variable, often higher ratings available | Typically include features like remote control, low-voltage disconnect, and sophisticated power management capabilities. | Advanced features improve safety and efficiency, ideal for complex systems with high power demands. More expensive. |
Wiring Diagrams and Schematics
Understanding your travel trailer’s electrical system, especially the battery switch, is crucial for safe and reliable operation. A clear wiring diagram is your roadmap to navigating this system, allowing for easier troubleshooting and maintenance. Without a proper understanding, even simple tasks can become complicated and potentially dangerous.A clear wiring diagram provides a visual representation of how the battery switch connects to other components in your RV’s electrical system.
This visual aid is invaluable for both understanding the existing setup and planning any modifications or repairs.
Simple Battery Switch Wiring Diagram
Imagine a simple diagram: We’ll have two batteries (Battery 1 and Battery 2), a battery switch (labeled “Switch”), and the trailer’s 12V system (labeled “Trailer”).
                                    +-----------------+
                                    |     Switch     |
                                    +--------+--------+
                                            |
                                            |
                                            |  12V System (Trailer)
                                            |
                                            V
  +-----------------+         +-----------------+
  |  Battery 1     |---------|                 |
  +-----------------+         |                 |
                               |                 |
                               |                 |
  +-----------------+         |                 |
  |  Battery 2     |---------|                 |
  +-----------------+         +-----------------+
The wire connecting Battery 1 to the switch allows the battery to provide power to the trailer.
The wire connecting Battery 2 to the switch allows the second battery to provide power to the trailer.
The wire from the switch to the trailer carries the 12V power to the trailer’s electrical system.
Importance of Understanding Wiring Diagrams, Battery switch on travel trailer function
Before attempting any work on your battery switch, carefully study the wiring diagram. This will help you identify the correct wires, understand the flow of electricity, and prevent accidental short circuits or other damage. Knowing where each wire goes and what it does is paramount for safe and efficient repairs or modifications. For instance, mistakenly connecting a positive wire to a negative terminal could lead to sparks, melting wires, and potentially a fire.
Implications of Incorrect Wiring and Safety Hazards
Incorrect wiring can lead to several serious problems, including:
* Short circuits: Connecting positive and negative wires incorrectly can create a short circuit, resulting in excessive current flow, overheating, and potentially a fire.
– Battery damage: Incorrect wiring can damage your batteries, reducing their lifespan or rendering them unusable.
– Electrical system damage: Incorrect wiring can damage other components in your trailer’s electrical system, leading to costly repairs.
– Personal injury: Incorrect wiring can lead to electric shock, burns, or other injuries.
Always prioritize safety when working with electrical systems. If you are unsure about any aspect of the wiring, consult a qualified electrician or RV technician. Don’t risk your safety or the integrity of your trailer’s electrical system by working without a thorough understanding of the wiring diagram.
Mastering your travel trailer’s battery switch is key to a worry-free RV experience. By understanding its function, troubleshooting common issues, and practicing safe operation, you’ll ensure reliable power for all your adventures. Remember regular maintenance is your best bet for preventing problems and extending the life of your battery switch. Happy travels!
Essential Questionnaire
What size battery switch do I need?
The appropriate amperage rating depends on your battery bank’s capacity. Consult your battery’s specifications and choose a switch with a higher amperage rating than your batteries’ maximum output.
My battery switch is making clicking noises. What’s wrong?
Clicking often indicates a low battery or a problem with the switch itself. Check your battery voltage and connections. If the problem persists, the switch might need replacement.
How often should I clean my battery switch?
Inspect and clean your battery switch at least once a year, or more frequently in humid or corrosive environments. Clean corrosion with a wire brush and baking soda solution.
Can I use a battery switch with a solar panel system?
Yes, but proper wiring and configuration are essential to prevent damage to your system. Consult a qualified electrician if unsure.
